Monitor Microsoft SQL Server securely with Nagios

There are several ways to monitor Microsoft SQL Server with Nagios and most of the time  remote checks are used and credentials passed. The plugins listed on the Nagios Exchange for SQLServer didn’t fit my needs. I wanted to know the SQL Server version and patch level because of possible security breaches. From a security perspective I wanted to monitor it in a secure way also so a local check would be the best option then. Of course the monitoring host is the only host that has access to the Nagios Agent by the host firewall and Nagios configuration. It would be nice that the check is as generic as possible and to accomplish that we can use one method to determine the version of SQL Server. The Microsoft KB321185 is listing several methods which is compatible with SQL Server version 2000 and newer. I used method 3, the query ‘Select @@version’, which give me a complete view of the SQL Server into one string. Additionally you get a free check if the SQL Server is running and processing queries properly 😉

The implementation of the check is a bit work and you need to make some slight changes for different SQL Server versions and how it is setup. Till the actual execution of the check it is straight forward from the Nagios side of it. As I said before the check should be as generic as possibly so I created a Host Group called ‘SQL Servers’ in Nagios. Added the members which are running SQL Server and created a service ‘SQL’ and linked it explicitly to this group. The service ‘SQL’ is using the service template ‘generic-server-with-nrpe’ and the check command parameter is ‘check_sql’. The Nagios configuration for the SQL Server check is done.

For all the added members the local ‘nsc.ini’ should be changed. Add ‘check_sql=scripts\check_sql.bat’ under ‘[External Scripts]’ and save the configuration. Restart the Nagios Agent otherwise the command won’t be recognized and don’t forget to enable the execution of external scripts in the configuration if you didn’t do it already.

The last part of the check is the content of the actual batch script that is executed and placed under the ‘scripts’ directory. Depending of the monitored SQL Server version and the actual setup you may need to tweak it for every server. The content of the batch script (check_sql.bat) for the different versions are as follow:

  •  SQL Server 2000 and newer
    @ECHO OFF
    osql -h-1 -E -Q "Select @@version;" | findstr /v "rows affected"
  • SQL Server 2005 and newer
    @ECHO OFF
    sqlcmd -h -1 -W -Q "Select @@version;" | findstr /v "rows affected"

In some cases you need to specify the server with the argument -S “server\instance”. The little advantage of the ‘sqlcmd’ over ‘osql’ command is that trailing spaces with argument ‘-W’ can be removed so the output is a bit cleaner. If somebody know a short way to remove the trailing space with ‘osql’ I would like to know that.

The ‘SQL’ service status under the host group view is showed as:

Microsoft SQL Server 2008 R2 (SP2) - 10.50.4263.0 (X64)

When you click on the service you get more detailed status information:

Microsoft SQL Server 2008 R2 (SP2) - 10.50.4263.0 (X64)
Aug 23 2012 15:56:56
Copyright (c) Microsoft Corporation
Web Edition (64-bit) on Windows NT 6.1 (Build 7601: Service Pack 1) (Hypervisor)

vCenter Single Sign On Service: the horror!

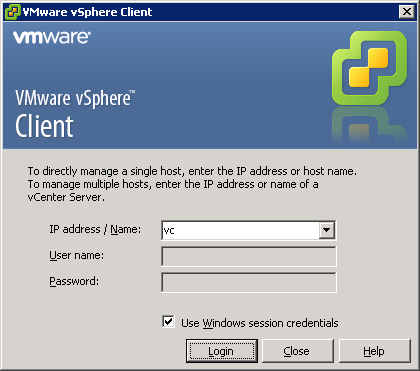
Since the introduction of vCenter Single Sign-On there are a lot of issues reported about logging on to vCenter. Every installation is different but a lot of us just do the simple installation which suits the needs for most environments. In case you did and are facing issues that you can’t log on anymore to your vCenter this could be the solution. If it is a upgrade to vSphere 5.1 or a fresh installation doesn’t matter. The most of us use the option ‘Use Windows session credentials’ and ‘Login’.

vSphere Client: Login

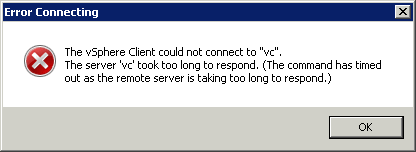
After a while you receive an error message that there was a error while connecting to the vCenter server.

vSphere Client: Error Connecting

That’s not what we wanted to see and it also didn’t do that prior the previous versions of vCenter. In the past there were some issues that looks exactly the same, see KB1032641. When checking the vSphere Client logs you’ll notice the following message:

<Error type=”VirtualInfrastructure.Exceptions.RequestTimedOut”>
<Message>The request failed because the remote server ‘vc’ took too long to respond. (The command has timed out as the remote server is taking too long to respond.)</Message>
<InnerException type=”System.Net.WebException”>
<Message>The command has timed out as the remote server is taking too long to respond.</Message>
<Status>Timeout</Status>
</InnerException>
<Title>Connection Error</Title>
<InvocationInfo type=”VirtualInfrastructure.MethodInvocationInfoImpl”>
<StackTrace type=”System.Diagnostics.StackTrace”>
<FrameCount>7</FrameCount>
</StackTrace>
<MethodName>Vmomi.ServiceInstance.RetrieveContent</MethodName>
<Target type=”ManagedObject”>ServiceInstance:ServiceInstance [vc]</Target>
</InvocationInfo>
<WebExceptionStatus>Timeout</WebExceptionStatus>
<SocketError>Success</SocketError>
</Error>

In this case the firewall isn’t the problem but has something to do how the vSphere client and Single Sign On works. It makes difference if you use the option to ‘Use Windows session credentials’ or just type the same credentials manually. Without using the option I was able to log on with a domain account which is in the same domain as the vCenter server is joined. That domain was auto discovered during the installation of vCenter Single Sign On. To use other external domains for authentication you need to add your external domains as ‘Identity Source’ in the SSO Configuration, see KB2035510. When using the vSphere Web Client I was able to log on most of the time with an external domain account but certainly not always and with the vSphere Client sporadic. It’s still strange that logging into vCenter did work sometimes 😉 To fix this issue properly we need to make sure that the used ‘Identity Source’ is added to the ‘Default Domains’. Also order the ‘Default Domains’ to your needs and don’t forget to press the ‘Save’ button, very important! After doing this everything will work like a charm.

Welcome to my (tech) blog!

It’s never too late to start blogging! So hereby I’ll start my blog with mostly technical challenges I’m facing during my work or hobby. Hopefully this blog will be helpful and time saving while you’re troubleshooting.